
Markdown and YAML
Markdown
Firstly, Zettlr is a Markdown1 editor. This means that with a manageable number of markup syntax, you can mark parts of the text as headings, as quotations, set them in bold or italics and add images.
The resulting documents are basically just text. This means that, if you have only worked with Word so far, you have to rethink your workflow a bit because the appearance of the end product is separate from the writing process. (Personally, I think this is a good thing).
Typical Markdown syntax looks like this:
#   1st Level Heading
##  2nd Level Heading
### 3rd Level Heading

* Un-ordered List

1. Ordered
2. List

**Bold**
_Italics_

> This is
> a quote
> by Important Person (1900)
More information about Markdown and helpful resources can be found here:
YAML
Yet Another Markup Language (YAML) is used to add metadata to Markdown documents. A YAML Frontmatter provides me with information about when I created a text, what it is called, what content it has (without having to read it again first) and contains other information that I would like to see there myself.
For example, the YAML Frontmatter of my collocation analysis assignment looks like this:
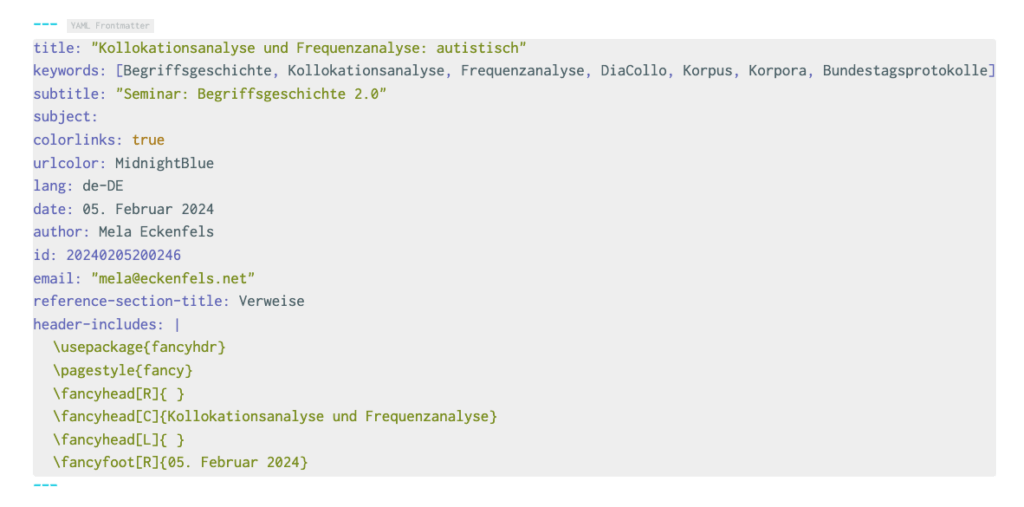
The title I entered is used by Zettlr to display the document’s entry in Zettlr’s sidebar …


… and will be automatically displayed as a heading when output as a PDF.

The name and date values set in the YAML Frontmatter are also displayed in the PDF export.

This somewhat cryptic-looking lower block defines the appearance of the header and footer:
![Zettlr screenshot: YAML lines that define the header and footer in the PDF output:
header-includes: |
usepackage{fancyhdr}
pagestyle{fancy}
fancyhead[R]{ }
fancyhead[C]{Collocation Analysis and Frequency Analysis}
fancyhead[L]{ }
fancyfoot[R]{February 05, 2024}](https://i0.wp.com/history.mela.de/wp-content/uploads/2025/06/YAML-Header-Kollokationsanalyse-Header.png?resize=1024%2C507&ssl=1)
This variable fancyhead[C] defines that the title is centred. If I had entered the title in fancyhead[R] or fancyhead[L] instead, it would have been set aligned right or aligned left.

fancyfoot[R] sets the date of the document right-aligned. In this example, the page number is not configured via the YAML Frontmatter. It is already preconfigured in Zettlr’s default configuration file for the PDF export. Those defaults are normally so useful that they do not need to be touched.

At first glance, such areas look difficult if you are used to visual ‘What You See Is What You Get‘ layout, as typical for word processors like Word or LibreOffice2.
Snippets
At first glance, the YAML Frontmatter block may seem unintuitive and unwieldy. But you don’t have to type it by hand every time because Zettlr offers a tool called »Snippets«.
With this tool, you’ll create short snippets that you then can reuse within Zettlr. Call up the snippet directory by typing a colon : after a space and select the snippet you need right now from the menu:
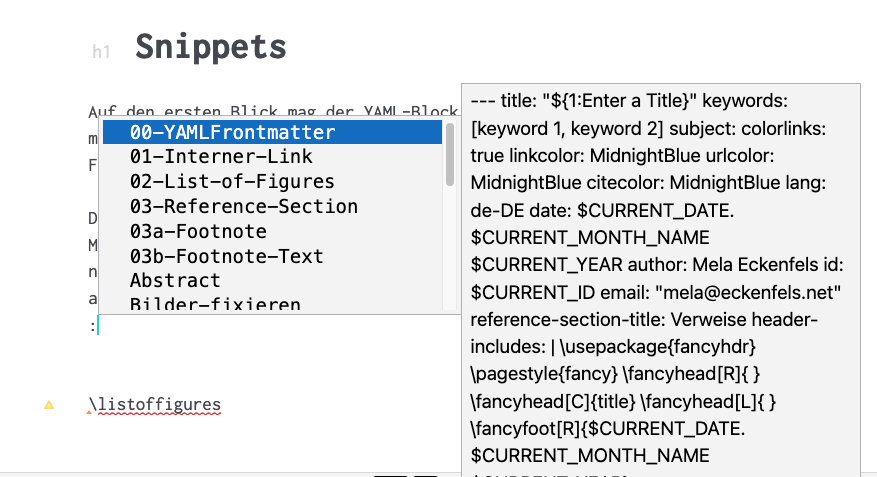
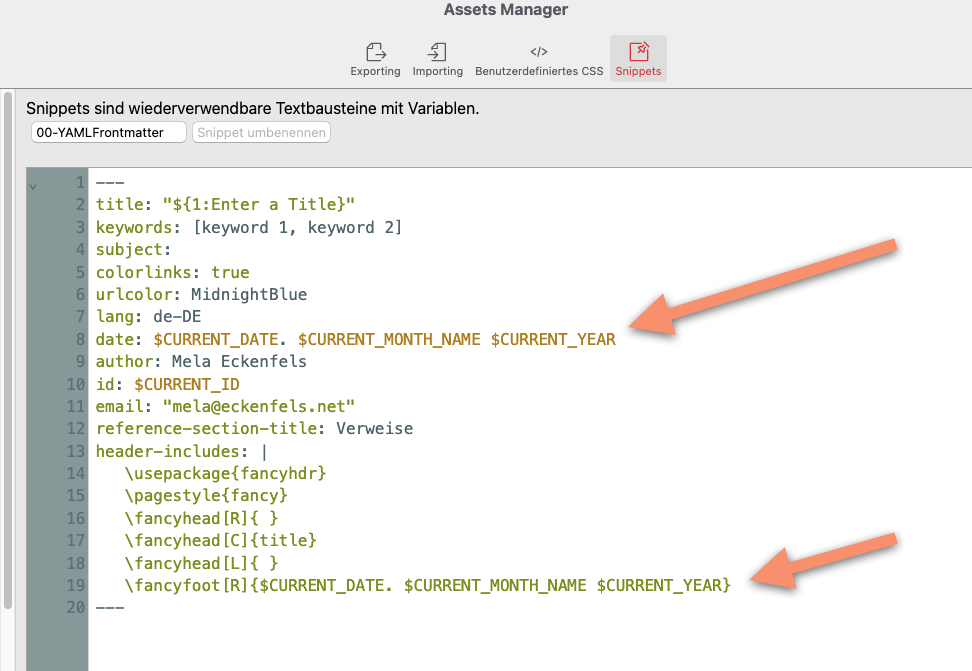
For example, the snippet for the YAML Frontmatter contains some variables3 which are automatically replaced with the correct values, when the snipped is filled into the document:
Images and the Image Directory
Images
Images are also represented and displayed in Markdown editors, including Zettlr, using markup syntax. It has two parts.

- The description of the image becomes the image’s caption in the PDF export.
- The storage location of the image (relative path)
Zettlr creates the markup automatically when you drag an image from the Zettlr sidebar into the editor. Only the image description needs to be edited manually. You also can select an image in any image editor, copy it, and then paste it directly into the Zettlr editor. An image import dialogue will open.
](https://i0.wp.com/history.mela.de/wp-content/uploads/2025/06/Bildseitenleiste.png?resize=594%2C720&ssl=1)
In the PDF export, it looks like this:
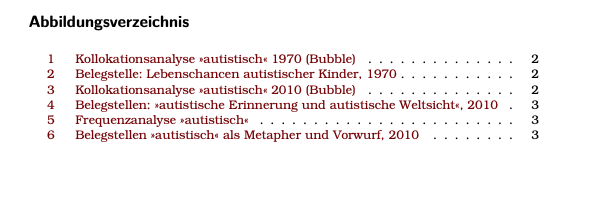
List of Figures
The list of figures is added in Zettlr with a single LaTeX command: Place this at the point in the document where you want to see the list of figures. This will usually be the end of the document.
I have added a snipped containing this command, so I don’t have to memorize it.

The PDF export looks like this:
Manipulating Layout
Forcing a Page Break
Sometimes it can be useful for the structure of your document to force a page break. For example, between the end of the text, the list of figures and the list of sources. This can be achieved by inserting the command …
\pagebreak\pagebreak
…
For this LaTeX command, I’ve also created a snippet.
PDF Settings
The appearance of the PDF, e.g. the width of the margins, or headings with or without numbering and other details are defined via the export configuration file. I will only touch the bare bones of those, as the basic settings supplied by Zettlr are usually sufficient. But you’ll find them in the “Asset Manager”, too, like the “Snippets” and are located in the “Exporting” tab.
To export as PDF, search for the entry with the added note “Markdown → PDF”.
Customize Some PDF Export Settings
Export With Table of Contents
In most cases, the basic settings are completely sufficient. However, if you want to include a table of contents, for example, you must copy the standard configuration file to a new file in the Zettlr asset manager and add the line …
toc: false # Include a table of contents?
… change to:
toc: true # Include a table of contents?
Also, have a look at the line directly following. It defines which heading levels are displayed in the table of contents.
Remember, in Markdown, the number of “#” indicates the level of the heading. The line:
toc-depth: 2 # 2 means to only include headings level 1 and 2 in the ToC
includes the headings of the first and second level, i.e:
#  1st Level Heading
## 2nd Level Heading
If you want to display 3 levels in the table of contents, change the 2 to 3.
toc-depth: 3 # 2 means to only include headings level 1 and 2 in the ToC
The following headings are now included:
#   1st Level Heading
##  2nd Level Heading
### 3rd Level Heading
It is usually better for clarity if only the first two or at most the first three heading levels are displayed in the table of contents. However, this depends on the topic and type of document.
One step further: Setting a document class scrartcl
To be able to export Markdown files with Zettlr, you need to install the LaTeX environment on the computer you want to use for exporting. This installs a whole host of useful extensions at the same time. This includes the package called Koma-Script.
Koma-Script offers useful default settings for academic texts. Just adding the lines to …
variables:
  documentclass: scrartcl
… the configuration file for the PDF export means that all headings are set in a sans-serif font, while the body text continues to use a serif font – Times New Roman is standard and required by the faculty. Changing the headings to sans-serif, though, makes the document look clean and slightly more modern.
Most of my PDF export configuration examples use the Koma-Script document type scrartcl.
Possible Stumbling Blocks
In the YAML Frontmatter as well as in the export configuration file, line-indentation is not optional. Start your own configuration from a default file and work with the line-indentation you’ll see there, and start with an example YAML Frontmatter as well. In addition, Zettlr offers a ‘linter‘. This means the tool will check if your changes will break the configuration and indicate a warning4.
Conclusion or tl;dr
Zettlr’s system of snippets and a robust export via LaTeX environment makes it possible to focus purely on the text.
At the beginning of your work, insert the YAML Frontmatter by pressing a colon to open the snippets’ menu. Fill in the title (and keywords) or add all the metadata that you want to see in the final document.
Add images to the document by dragging them into the document or by copy & paste and then edit the image descriptions.
Press the colon again to insert the “list of figures” from the snippets’ menu at the position where it should appear in the document.
The result looks clean and neatly formatted with little effort.
More complex layouts are also possible, e.g. with a detailed cover page, but this simple output format is sufficient for smaller writing assignments.
If you enter not only your name and email address in the YAML Frontmatter, but also meaningful keywords, these are included in the PDF export, as is the outline. The PDF therefore has meaningful metadata and can be easily navigated via the table of contents (if activated).
- From ‘markup‘ ↩︎
- However, I am planning to create templates for students of the faculty, which can then simply be adopted. ↩︎
- The “ID” is not relevant in this context. You’ll need it only, when you use Zettlr as a knowledge management tool, or “Zettelkasten” — a concept by Niklas Luhmann. ↩︎
- In the asset manager, this will appear as an orange dot in front of the faulty line. ↩︎
Additional Resources
- My snippets – on GitLab @ KIT
- My export configurations – on GitLab @ KIT
- This (and in the future also more) manual(s) as PDFs – on GitLab @ KIT
PDF Download
References
Last modified:
Bildquellen
- Der ausgefüllte YAML-Block meines Textes zur Kollokationsanalyse: Mela Eckenfels | CC BY-NC 4.0 International
- YAML-Header Title: Mela Eckenfels | CC BY-NC 4.0 International
- Anzeige In Zettlr: Mela Eckenfels | CC BY-NC 4.0 International
- PDF-Ausgabe: Mela Eckenfels | CC BY-NC 4.0 International
- YAML-Header-Kollokationsanalyse-Metadaten: Mela Eckenfels | CC BY-NC 4.0 International
- YAML-Header-Kollokationsanalyse-Header: Mela Eckenfels | CC BY-NC 4.0 International
- Header Oben: Mela Eckenfels | CC BY-NC 4.0 International
- Footer: Mela Eckenfels | CC BY-NC 4.0 International
- Snippets: Mela Eckenfels | CC BY-NC 4.0 International
- YAML-Header-Snippet: Mela Eckenfels | CC BY-NC 4.0 International
- Bildauszeichnung: Mela Eckenfels | CC BY-NC 4.0 International
- Bildseitenleiste: Mela Eckenfels | CC BY-NC 4.0 International
- Abbildung6PDF: Mela Eckenfels | CC BY-NC 4.0 International
- Abbildungsverzeichnis: Mela Eckenfels | CC BY-NC 4.0 International
- AbbildungsverzeichnisPDF: Mela Eckenfels | CC BY-NC 4.0 International